Development of Grouping the Overflowed Tags or Chips
The development of grouping the overflowed tags or chips with the solution code.
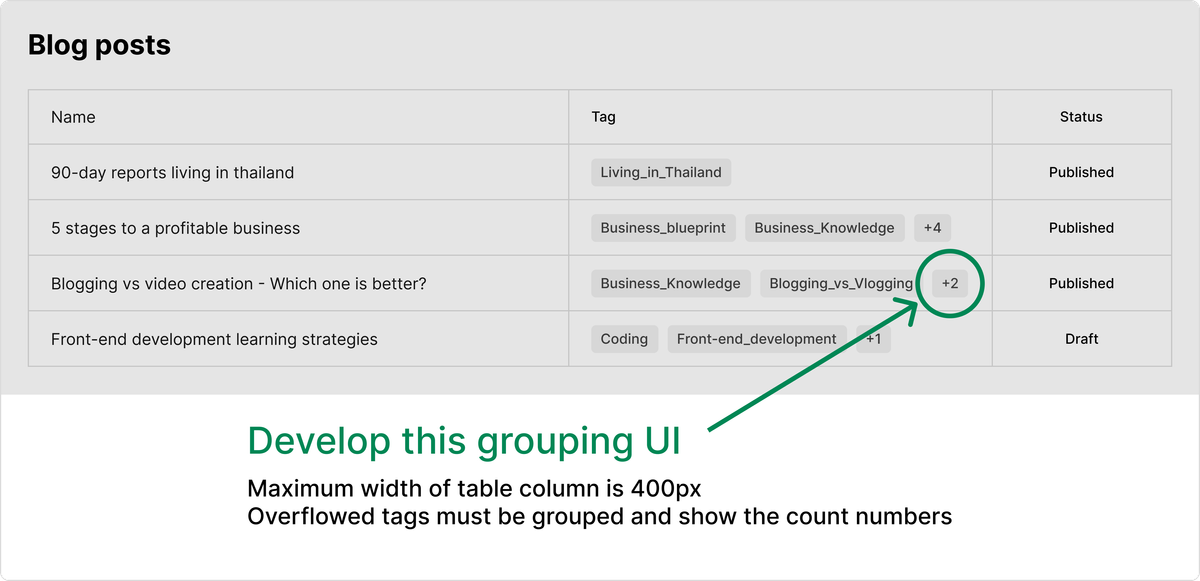

Let's say you are given this UI to develop, and here are the requirements
- The maximum width of the "Tag" column is 400px.
- Show as many tags as possible within the table cell, and if there are overflowed tags, group the remaining tags and show the count of hidden tags.
- So that I don't expose my company's project.
- It is still relevant as a real-world problem to solve.
- To give you an idea about a feature in one project that can be adapted into a similar feature in another project.
Let's get started.
Algorithm thinking to solve the problem
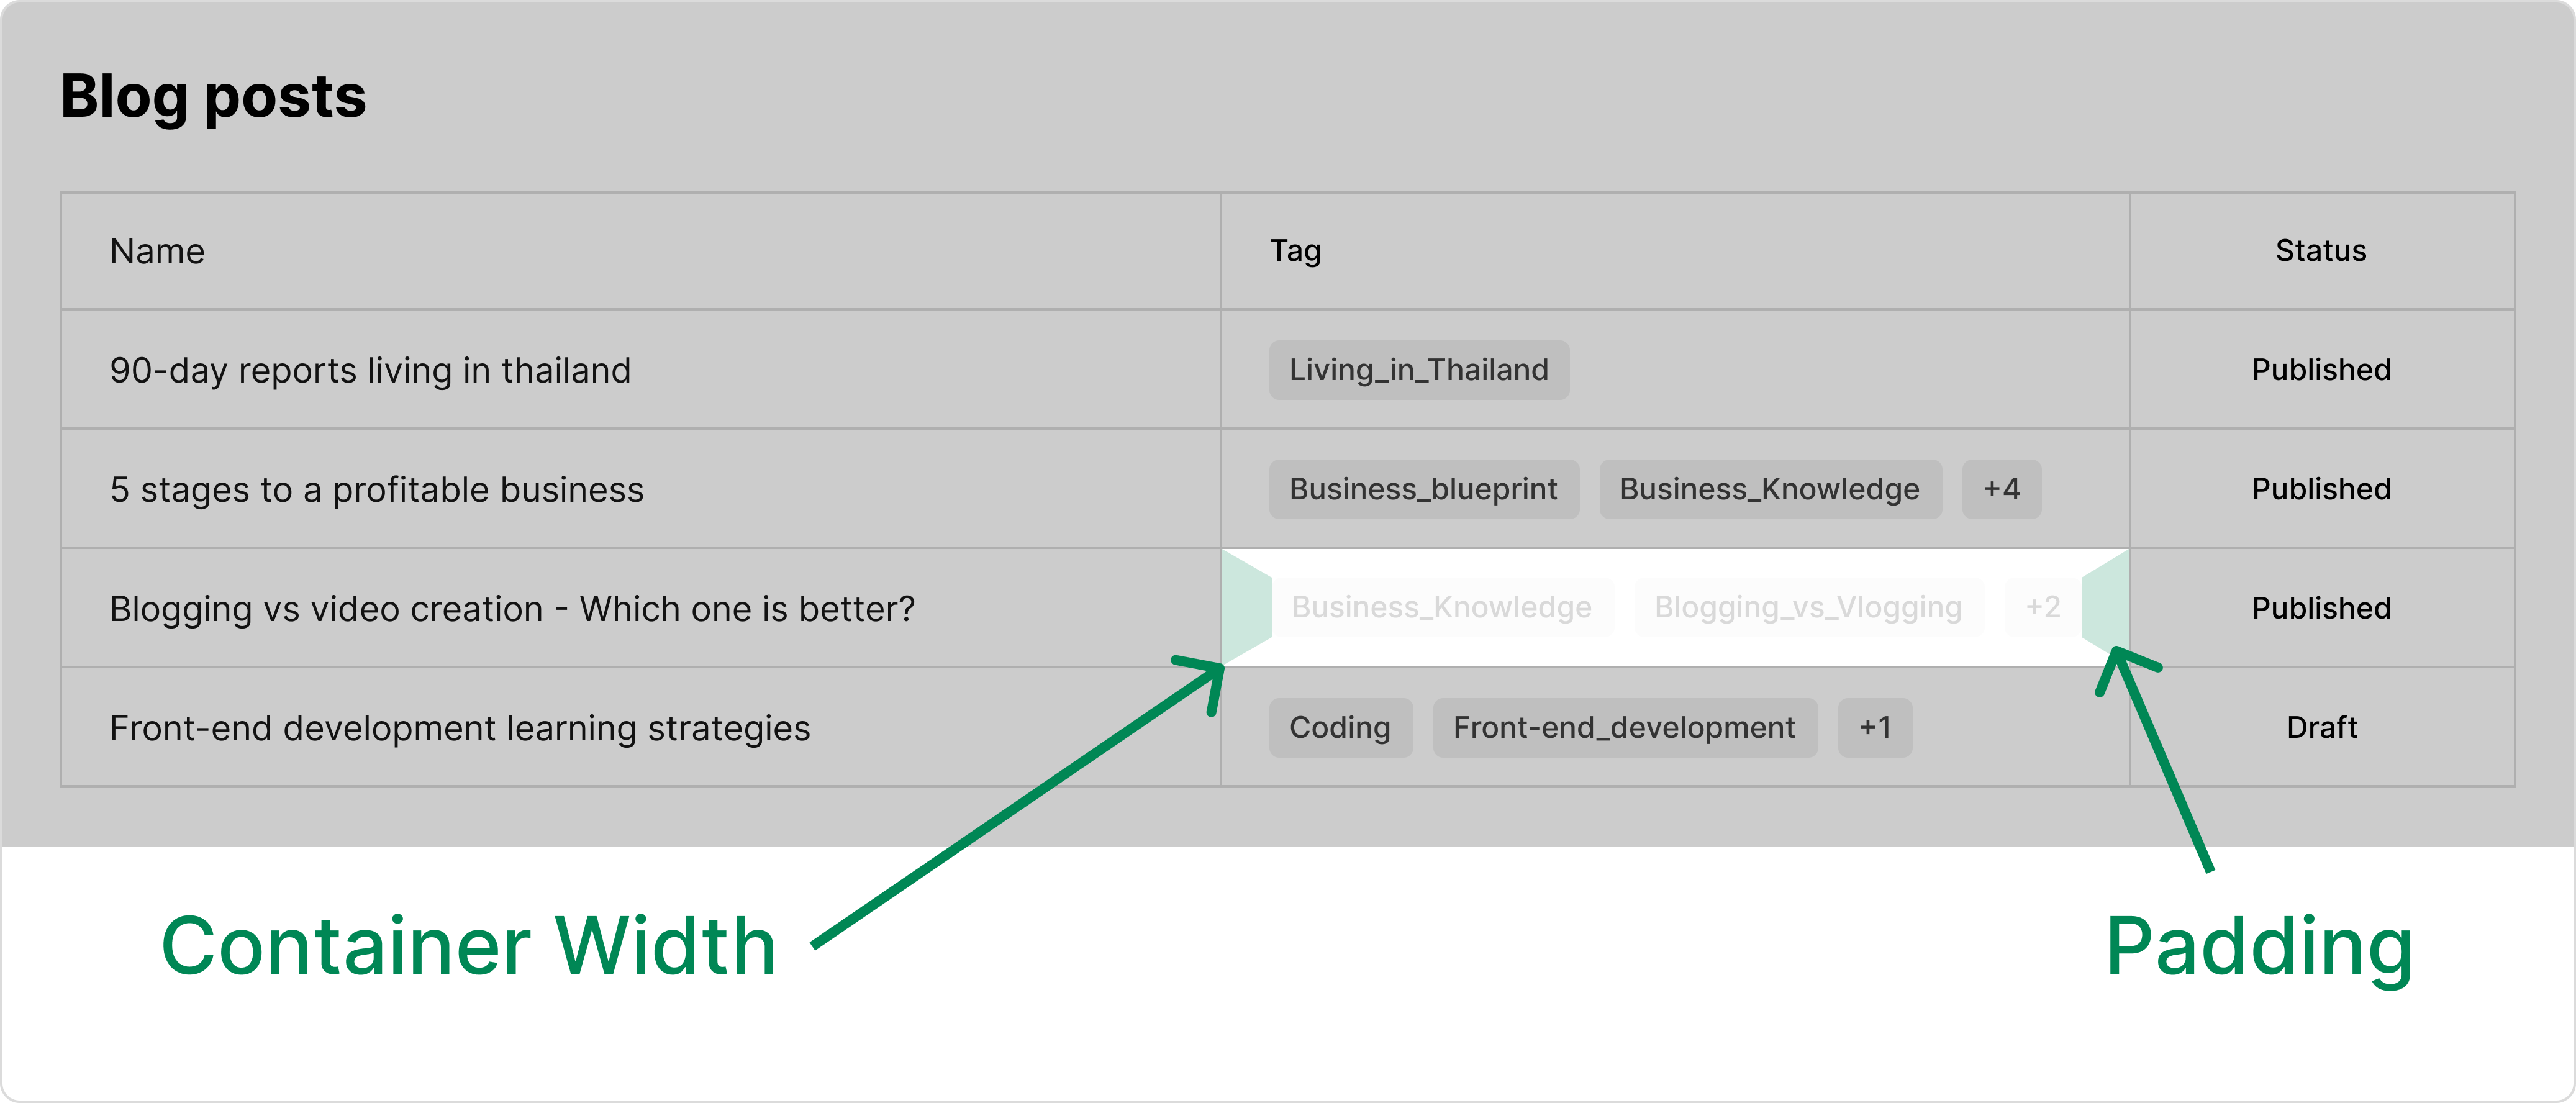
The requirement says the maximum width is 400px, so it can also be narrower than that. The first step is to determine the width of the table cell. Then we need to get the padding-left value and the padding-right value. It is better to get them separately since they might have unequal spacing. We won't know.
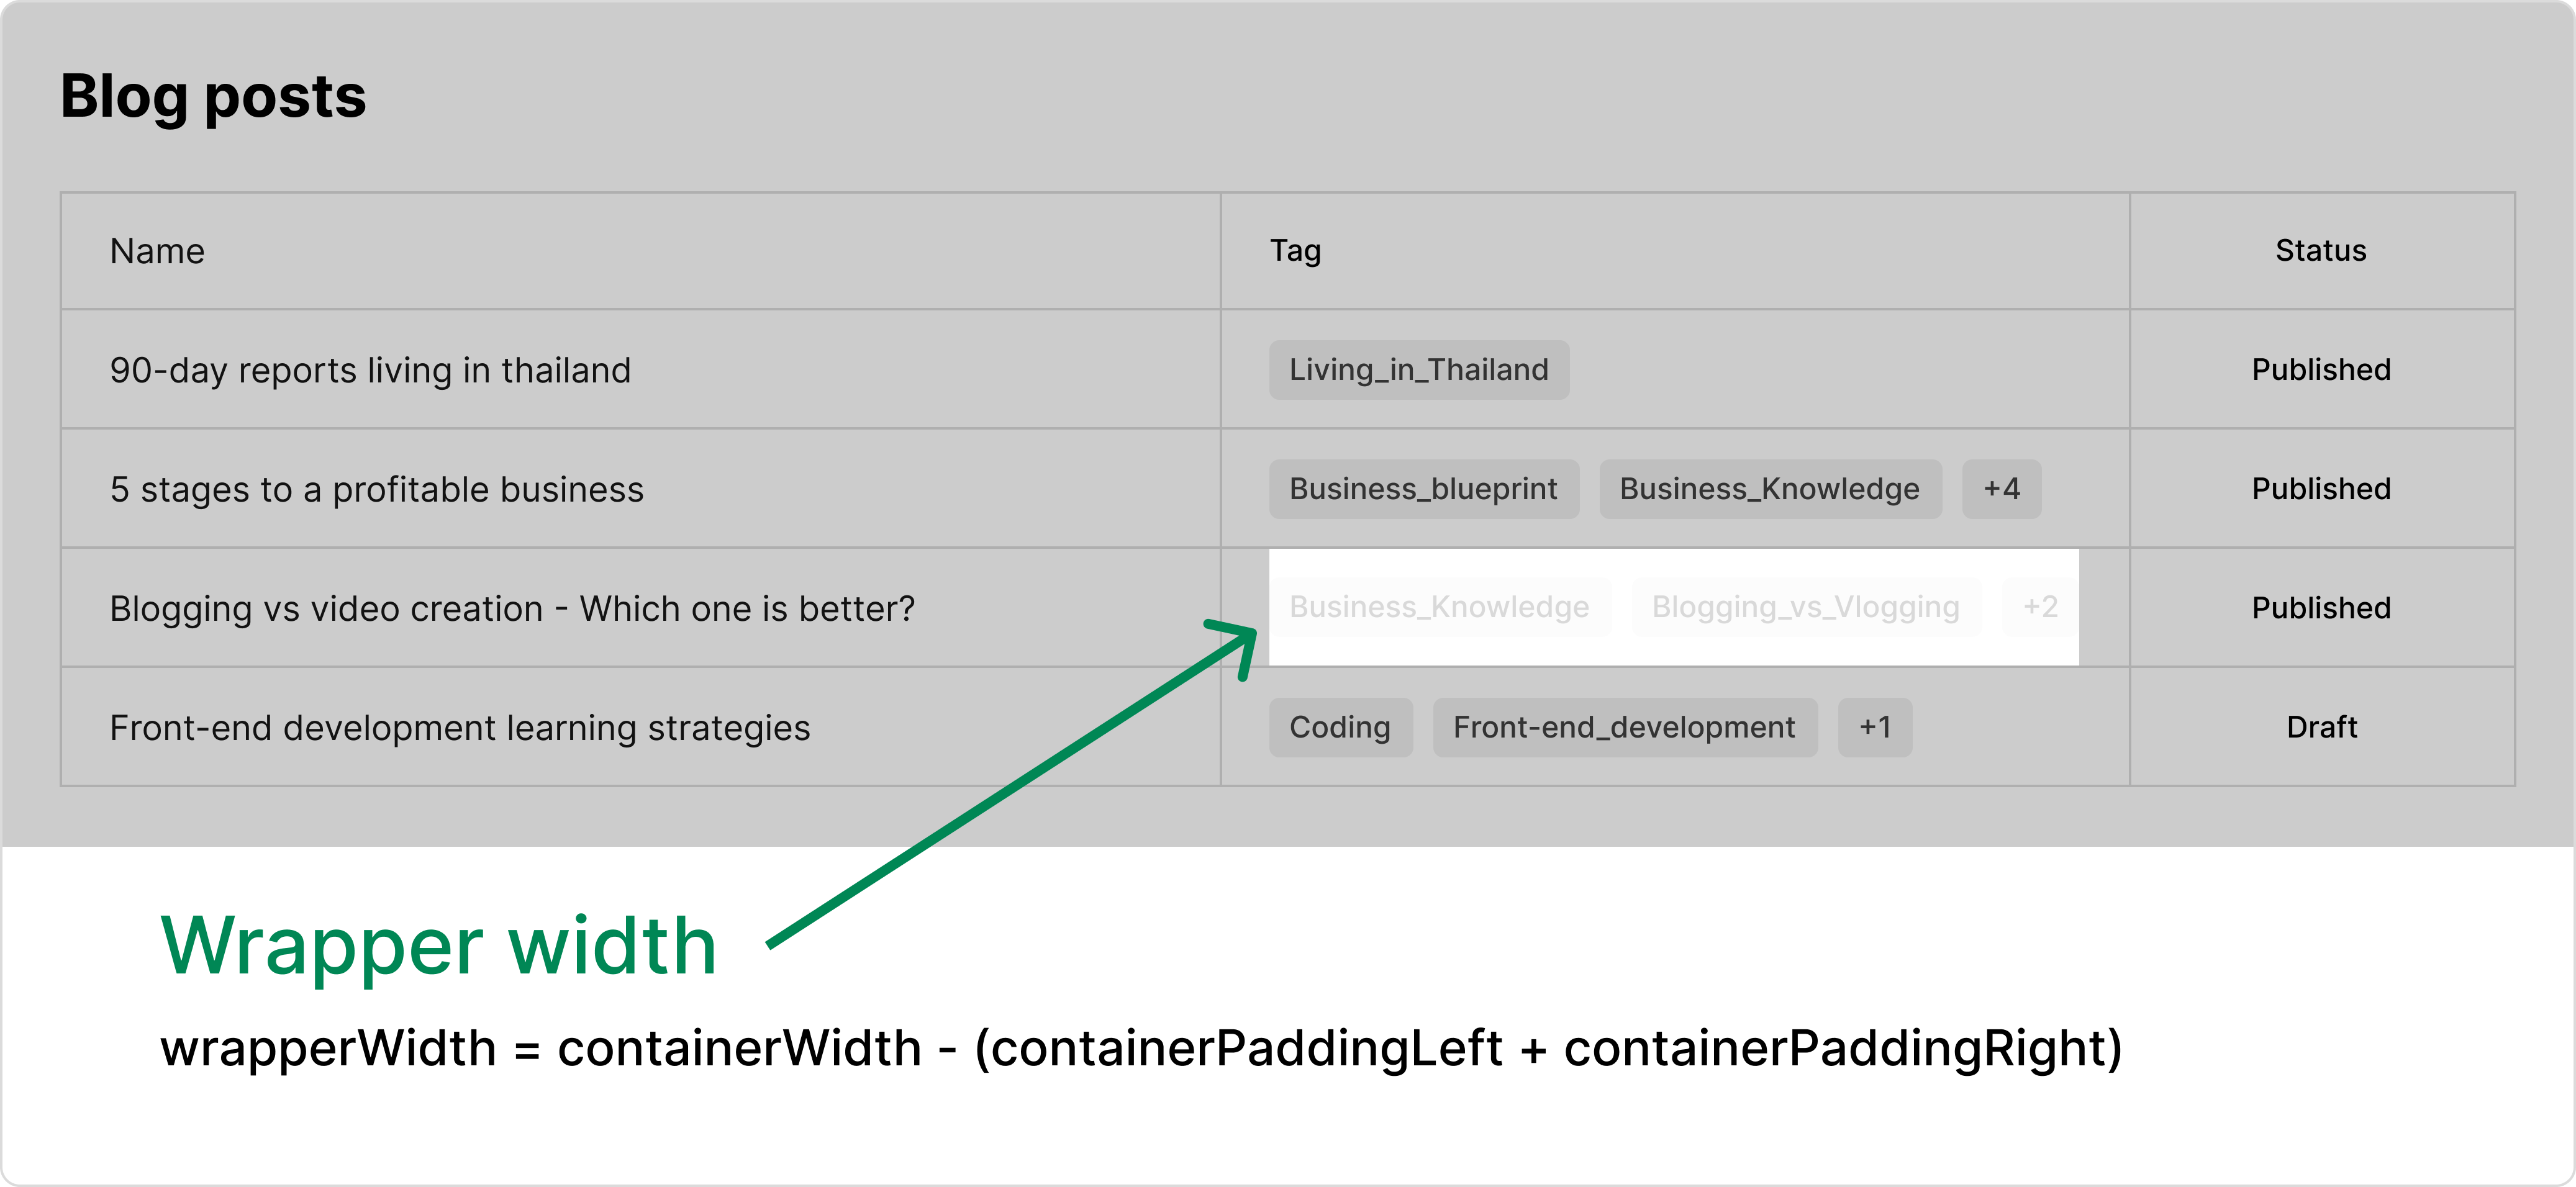
The total padding value of the container will be the sum of the left and right padding values. If we subtract it from the total container width, we will get the width for the wrapper area. While you can get the width of the wrapper by selecting the wrapper directly, the subtracting solution is a better one in my opinion because that wrapper area may be influenced by the CSS, for example, width: "max-content". In such a case, you will be getting an unexpected width.
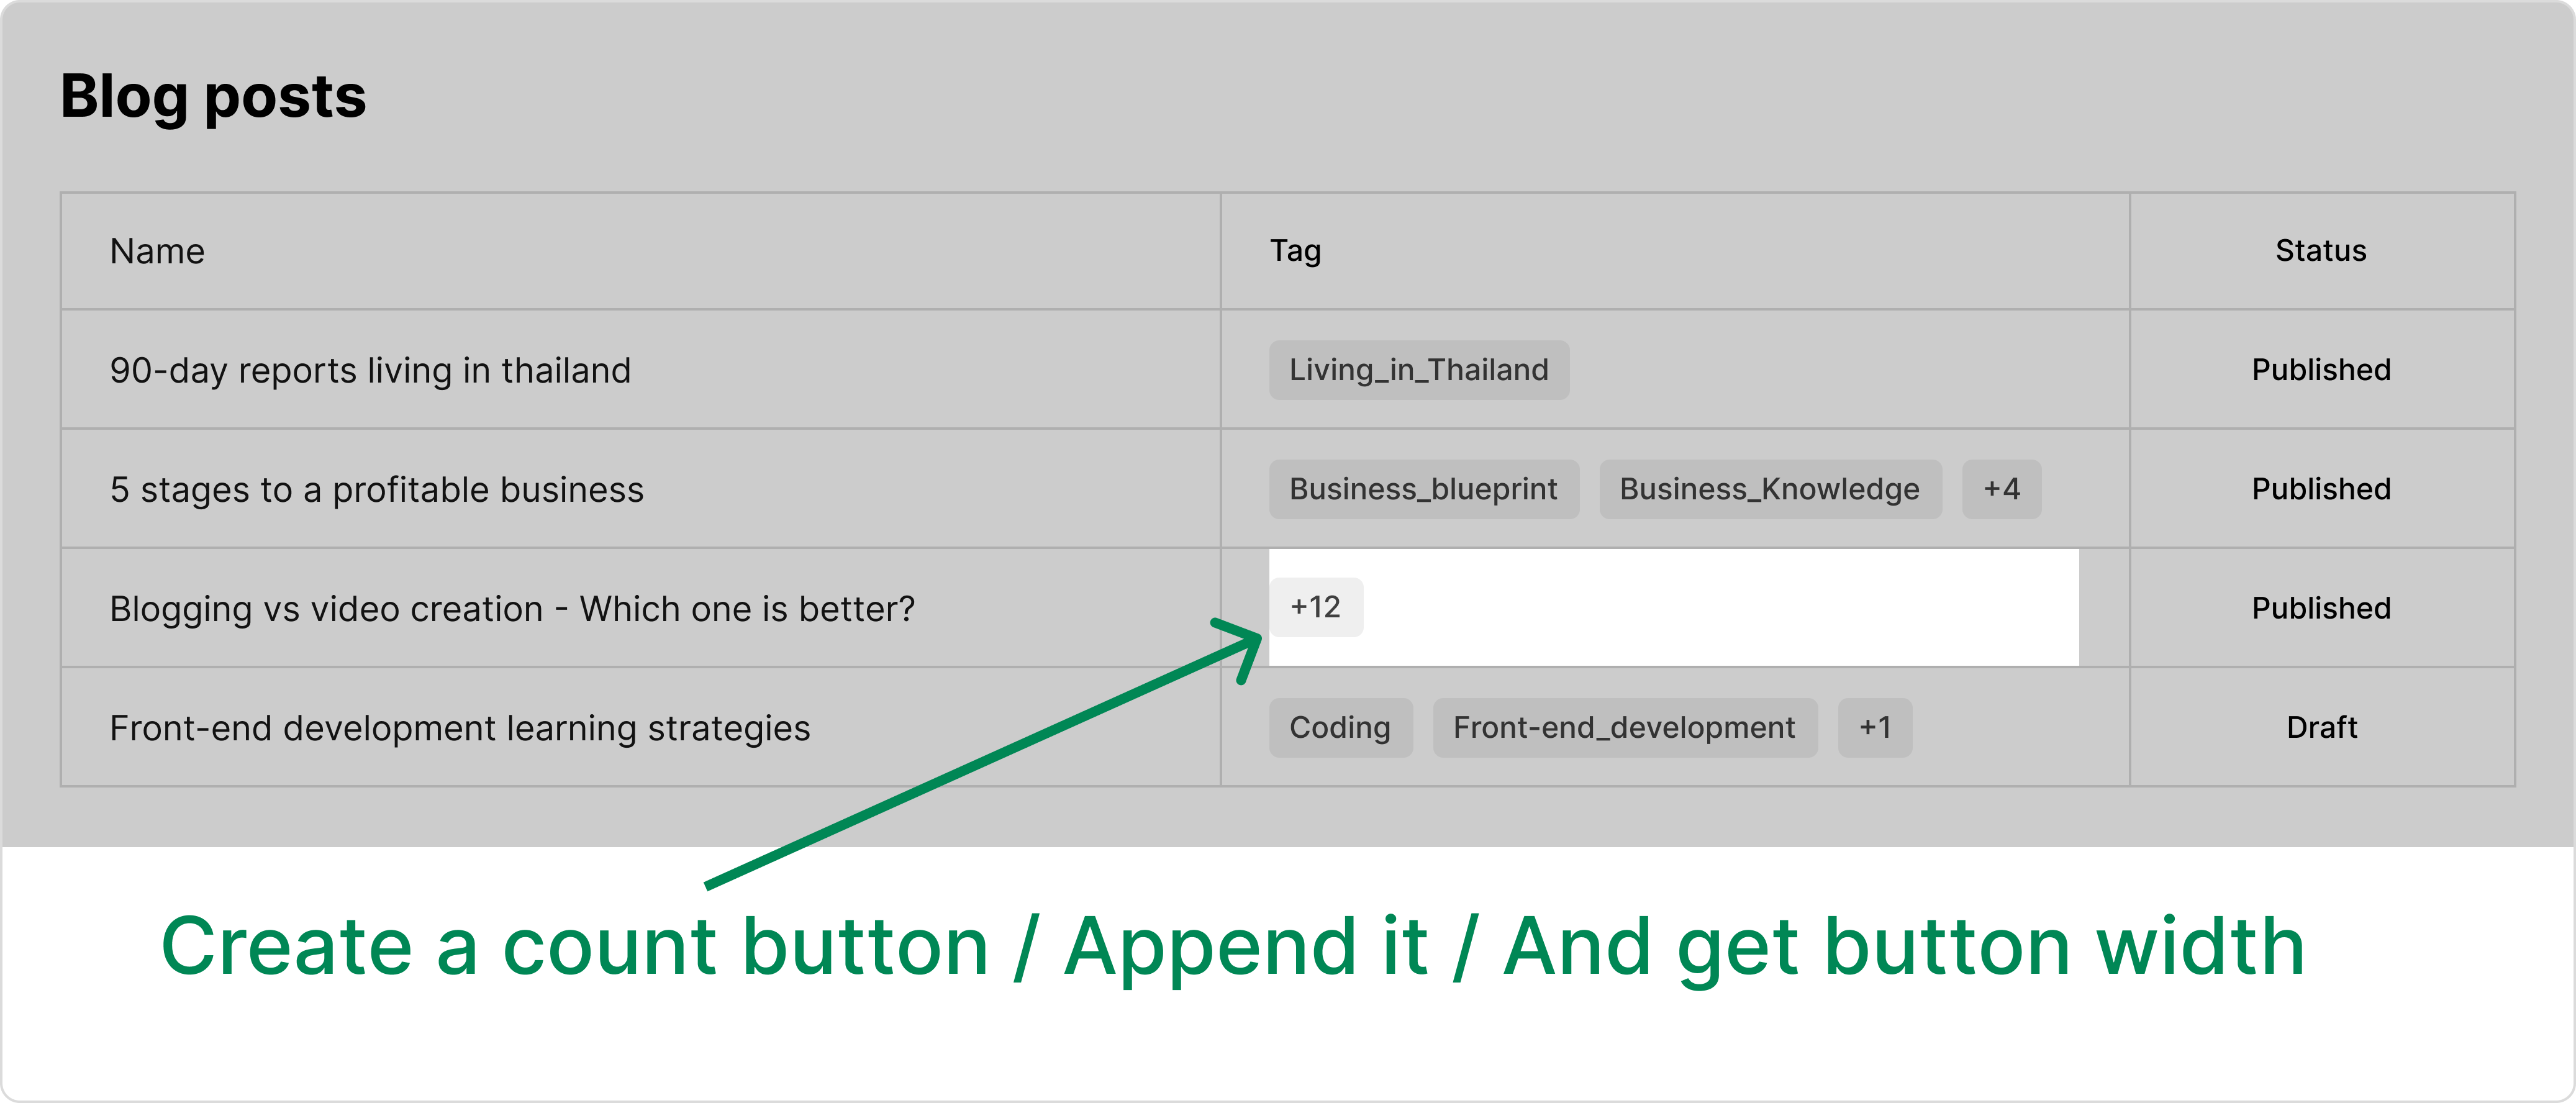
Now that we have the wrapper width, we can start by creating the button to show the hidden count first. This is crucial because if you try to render the tags first, the tags might fill up quickly, leaving no room for the count button to fit in. We need to create the button first. Assign the length count of the tags array. Append it to the wrapper area and get its width.
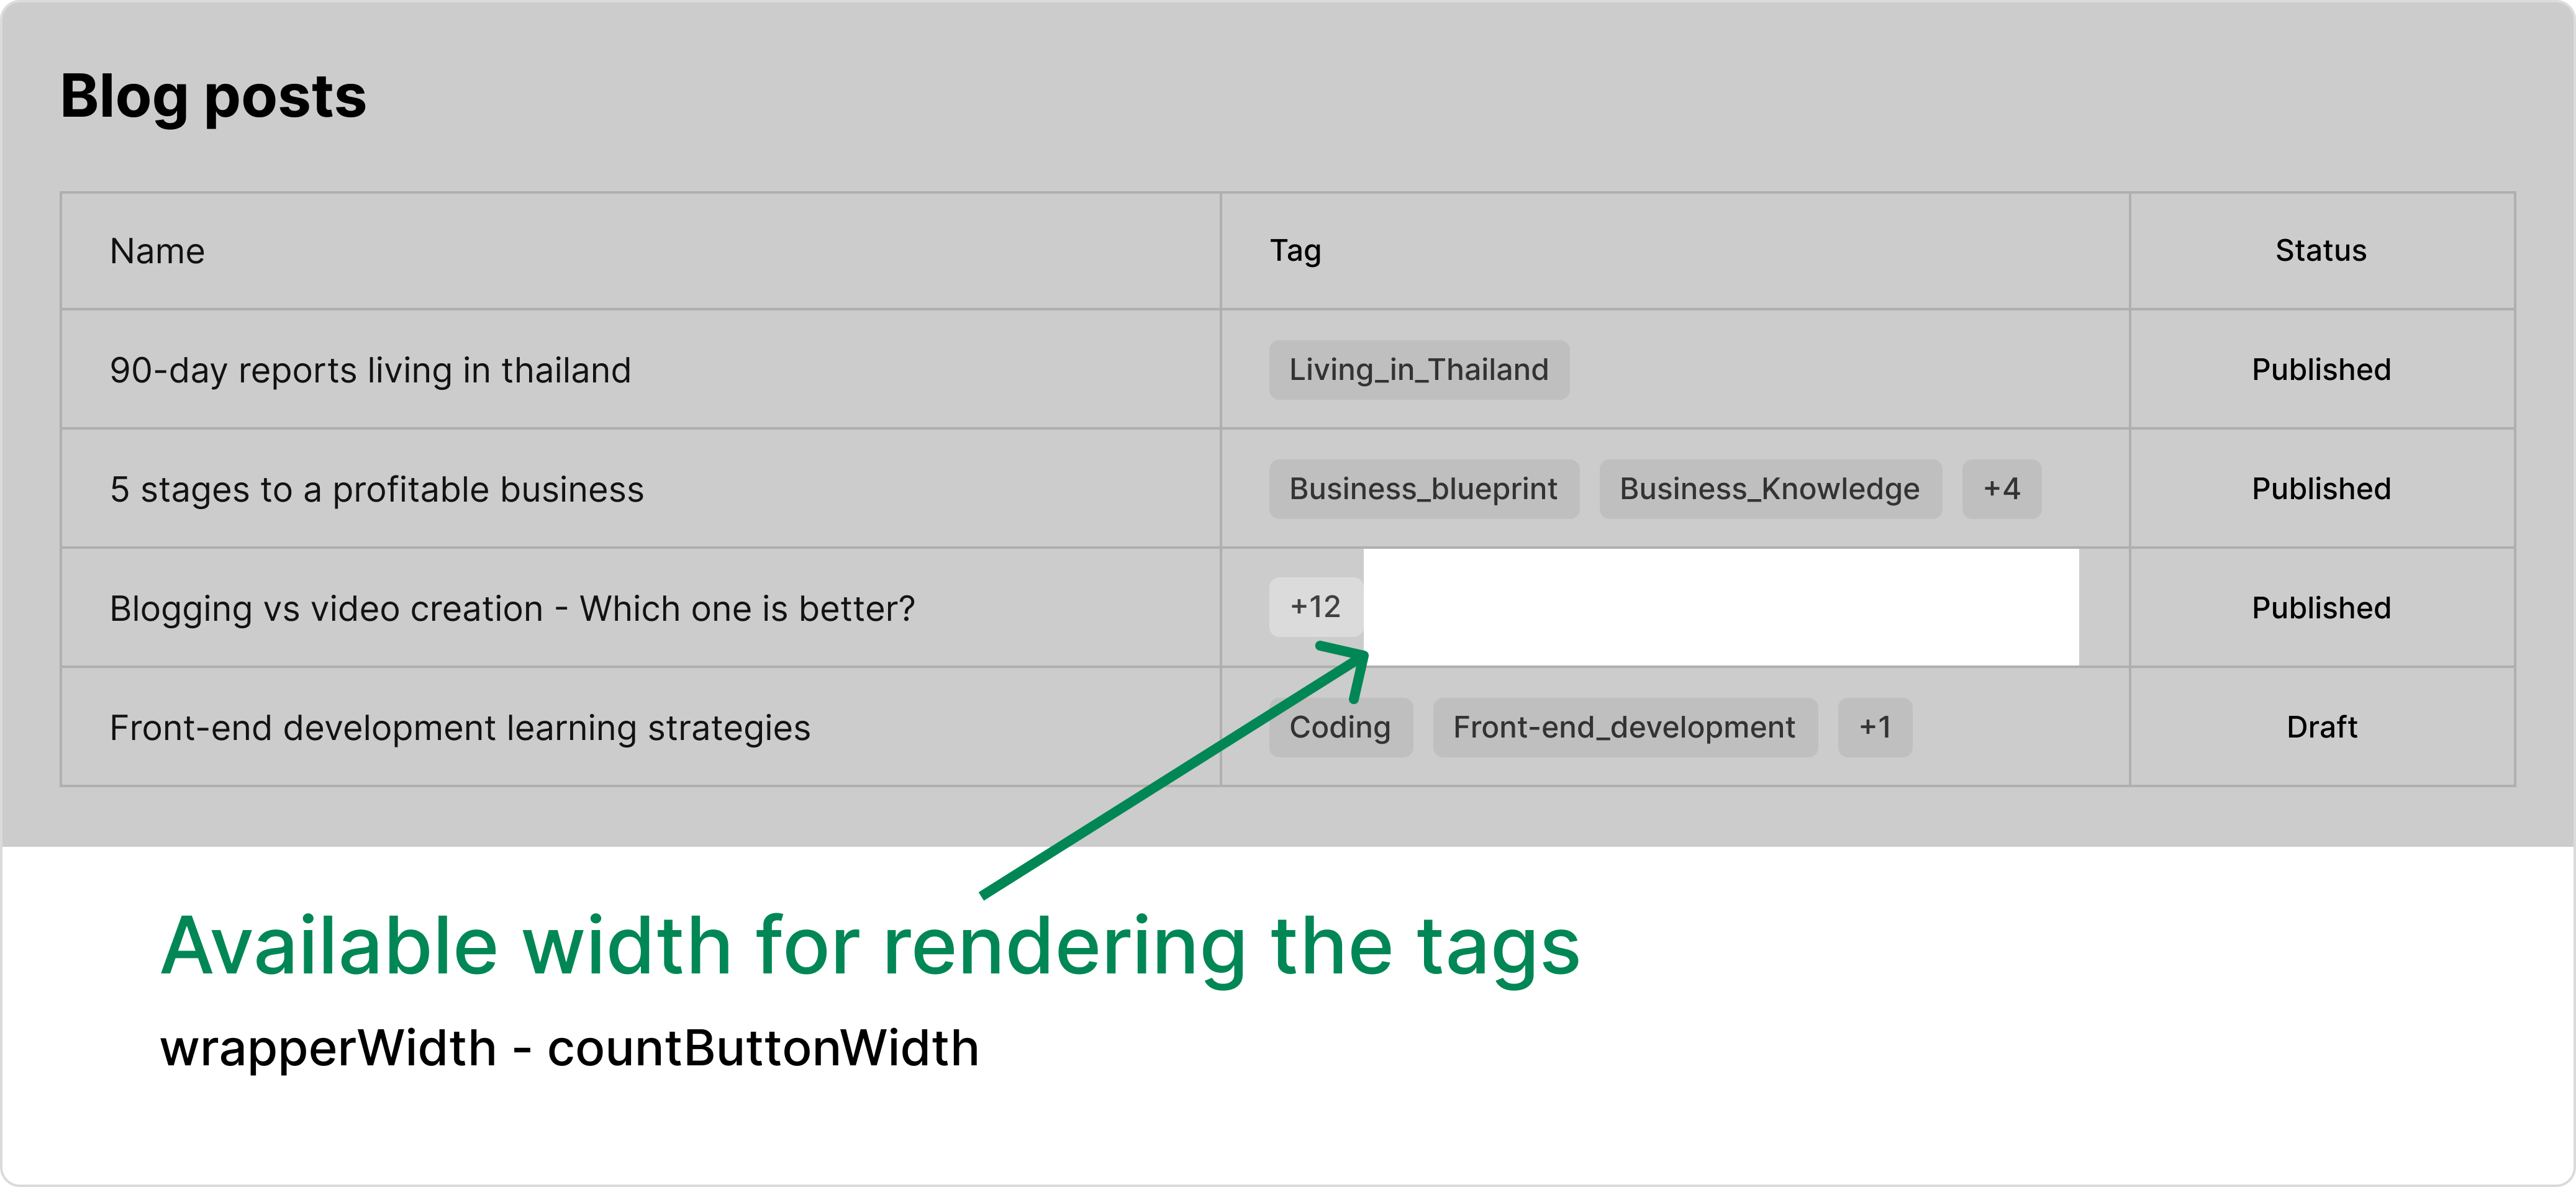
When we subtract the width of the button from the wrapper width, we will get the available width for rendering the tags.
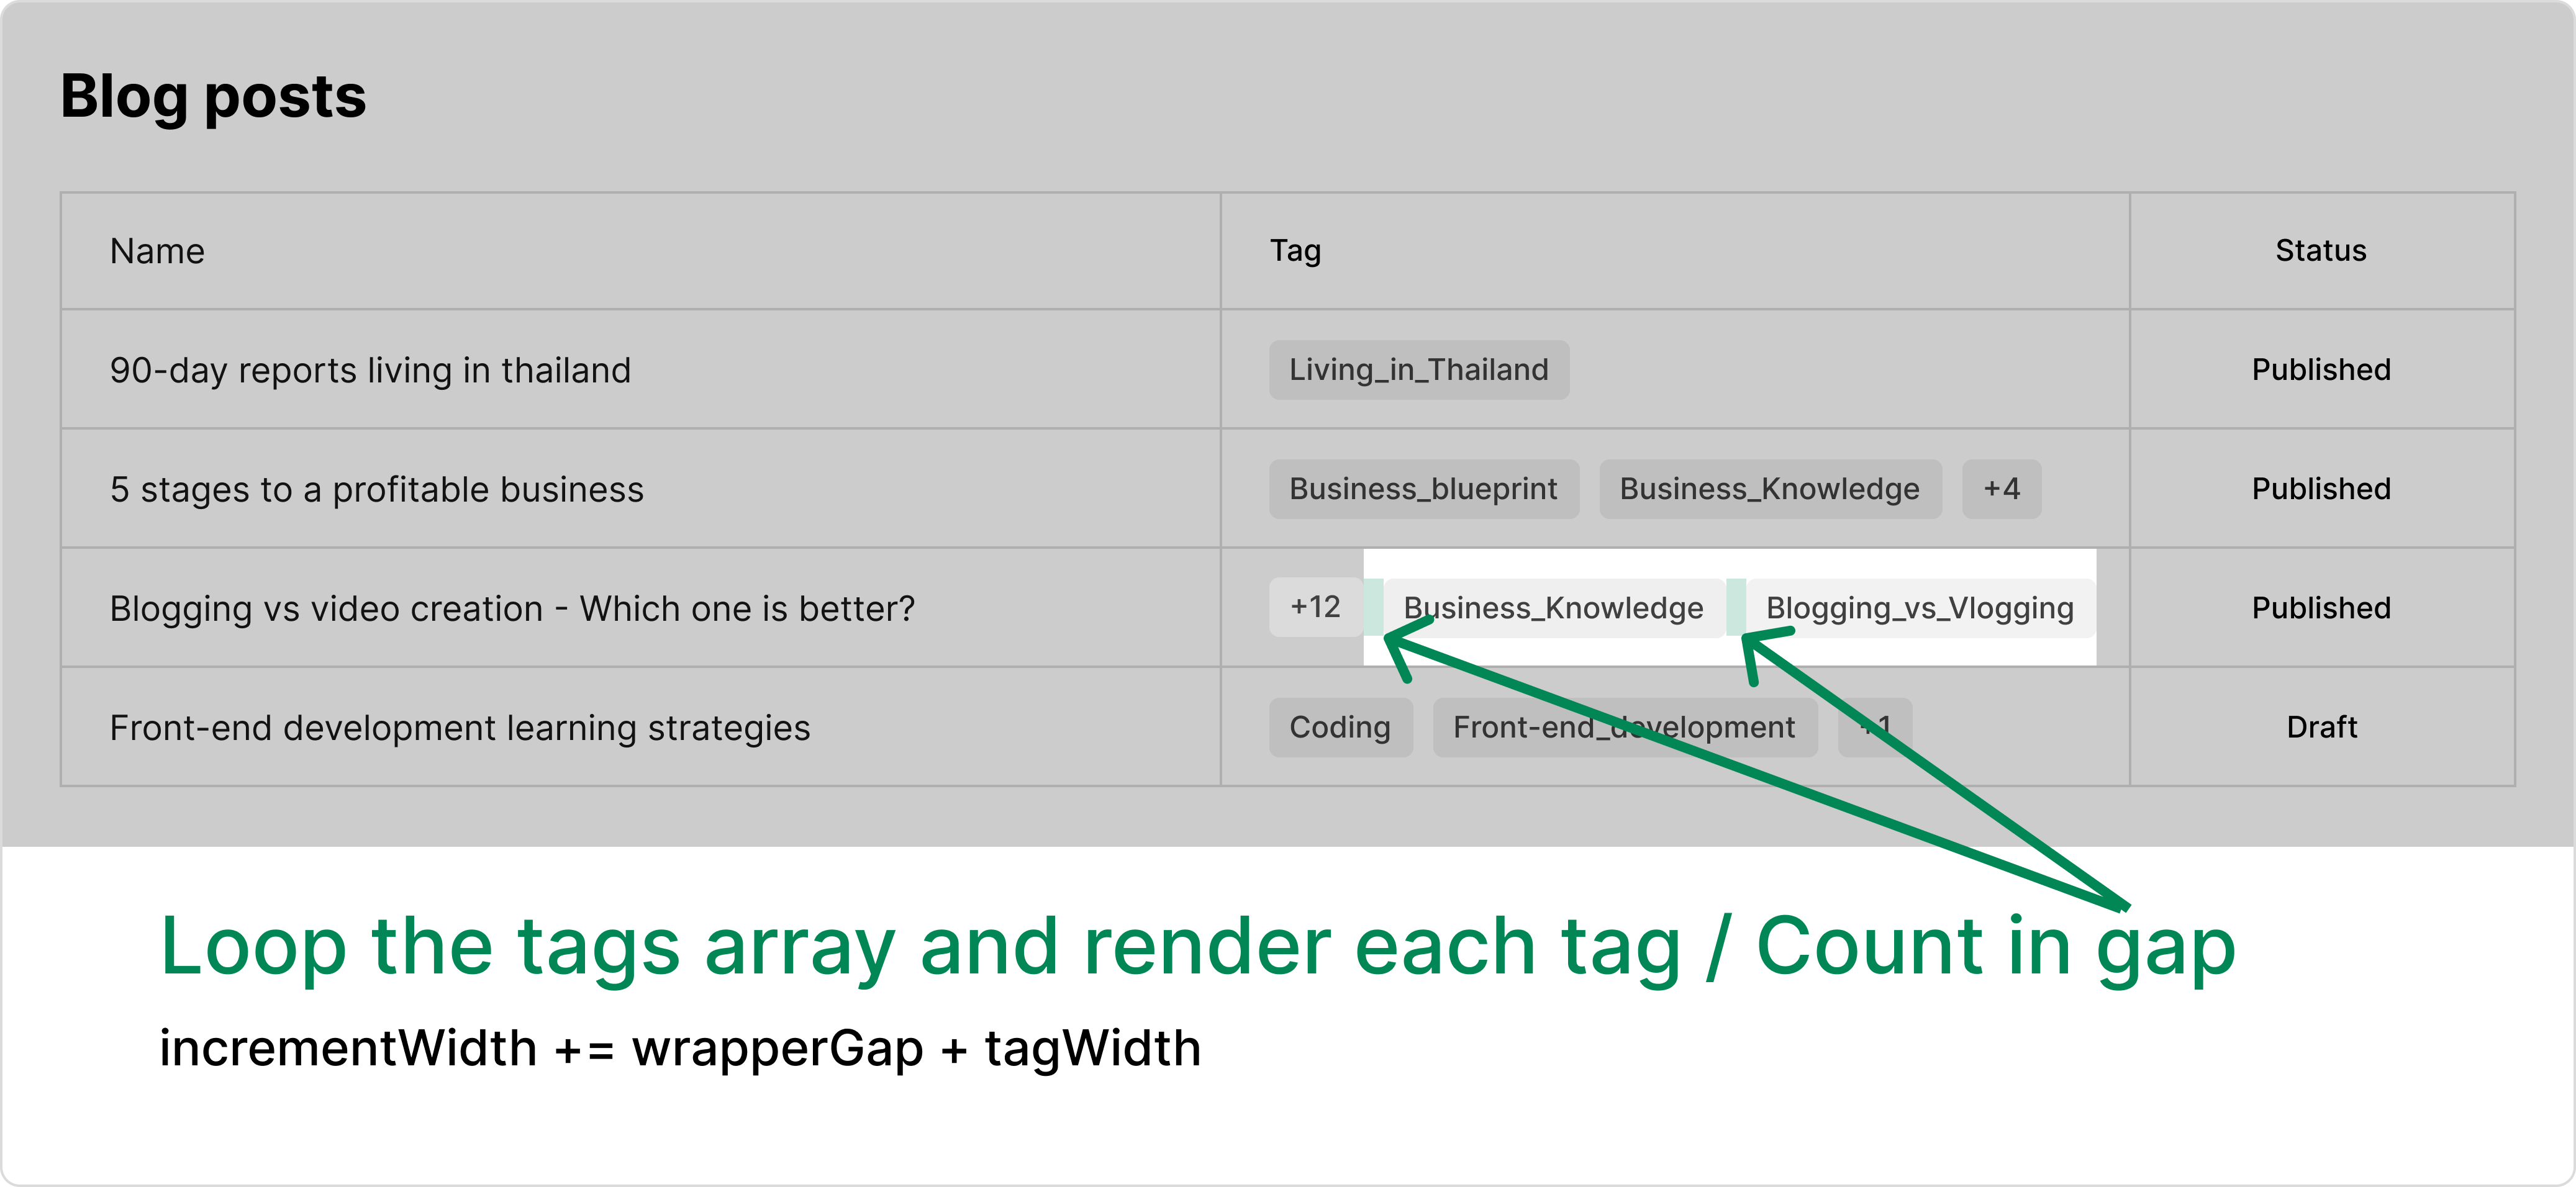
Now we can start rendering the tags. Also, remember the wrapper container will have some kind of gap value between each tag. So also count in for that. For each iteration, we append a tag to the wrapper, and we also need to keep track of the increment width. Subtracting the incremented width from the available area will give us a width value to decide whether another tag can fit in or not. We can define two arrays: one for visible tags and another for hidden tags. If the next tag can fit in, add the tag values to the visible tags array. Otherwise, add it to the hidden array.
We also need to keep in mind to remove all tags and hidden count buttons from the wrapper. Because the purpose of the function is to return visible tags and hidden tags, and doesn't include modifying the user interface. Take in an array, separate it into two, and return. That's it. Now we have the algorithm ready. The next step is coding.
Coding to implement the solution
First of all, let's start with pseudo-code. Capturing our logic in a written form. It clears your vision even if someone interrupts you in the middle of your coding. Even more, if you have installed AI plugins in your code editor, AI can code it for you. Or you can just hit the tab for the code suggestions.
/**
 *  Define a function called separateTags; Accept 4 parameters -- tags array, container element, wrapper element, and maximum width for container
 *
 *  I any of those values are undefined, early return an object with an empty visibleTags array and an empty hiddenTags array
 *
 * Get the container's padding-left and padding-right and store them in variables
 *
 * Subtract the container's padding values from maxWidth to get the wrapper's width
 *
 * Get the wrapper's gap and store it in a variable
 *
 * Define a variable to keep track of the increment width for rendering the tags and button
 * Define the visibleTags array
 * Define the hiddenTags array
 *
 * Create a button element and set its text content to "+{tags.length}"
 * Style the button
 * Append the button to the wrapper
 * Get the button's width and increment the increment width by the button's width
 *
 * Loop through the tags array, and for each tag, do the following:
 * Create the tag with specified styling
 * Append the tag to the wrapper
 * Increment the increment width by the wrapper's gap plus the tag's width
 *
 * if the increment width is less than the wrapper's width, append the tag to the visibleTags array
 * Else, append the tag to the hiddenTags array
 *
 */
Below is the solution code written in JavaScript. The purpose of accepting the container is to subtract that container's padding values from the available width. The purpose of accepting the wrapper is to know how much gap value the wrapper element has defined. So that everything can be controlled by the CSS outside of this function, and the function can calculate the correct dimensions to render the tags.
import _ from 'lodash'; // to use a utility to check for an empty array

const separateTags = (tags = [], container, wrapper, maxWidth = 400) => {
  if (_.isEmpty(tags) || !container || !wrapper) {
    return {
      visibleTags: [],
      hiddenTags: []
    };
  }

  const containerStyleValue = window.getComputedStyle(container, null);
  const containerPaddingLeft =
    parseInt(containerStyleValue.getPropertyValue('padding-left')) || 0;
  const containerPaddingRight =
    parseInt(containerStyleValue.getPropertyValue('padding-right')) || 0;
  const containerPadding = containerPaddingLeft + containerPaddingRight;

  const wrapperWidth = maxWidth - containerPadding;
  const wrapperGap =
    wrapper ? parseInt(window.getComputedStyle(wrapper, null).gap) : 0;

  let incrementWidth = 0;
  const visibleTags = [];
  const hiddenTags = [];

  const groupedButton = document.createElement('button');
  groupedButton.textContent = `+${tags.length?.toString()}`;
  groupedButton.style.padding = '4px 8px';

  container?.appendChild(groupedButton);

  const groupedButtonWidth = groupedButton.offsetWidth;

  incrementWidth += groupedButtonWidth;

  container?.removeChild(groupedButton);

  tags.forEach((tag) => {
    const tagElement = document.createElement('span');
    tagElement.textContent = tag.name;
    tagElement.style.padding = '4px 8px';

    container?.appendChild(tagElement);

    const tagWidth = wrapperGap + tag.offsetWidth;

    incrementWidth += tagWidth;

    if (incrementWidth < wrapperWidth) {
      visibleTags.push(tag);
    } else {
      hiddenTags.push(tag);
    }

    container?.removeChild(tagElement);
  });

  return {
    visibleTags,
    hiddenTags
  };
};
Can we optimize the code further?
Now we have the working code, and we have successfully developed the requirement. But we can also optimize the looping of the tags array and create elements.

As you can see in this picture, only two to three tags may fit in with such a 400px max width. What if some tags array contains, for example, 12 items? Looping through those every 12 items will be a waste of computing. So we can break the loop earlier for that. We currently use the "forEach" loop for looping, and there is no built-in way to break out of it.
One of the solutions I can think of is to change it with the array's "some" method. By using the "some" method and adding a conditional check whether the increment is at that time greater than or equal to wrapper width, JavaScript will stop the looping at the first encounter of that conditional check to be true. In our above example of 12 items in a tag array, we can save a lot of computing, for example, if we ran out of space after the third item. The iteration will stop there.
tags.some((tag) => {
  // Element creation code
  // Width increment code
  // Separating into visible and hidden tags code

  return incrementWidth >= wrapperWidth;
});
I can write about the optimized solution right away, but I want you to get an idea about making it work first, and optimization comes later. I initially couldn't think of that early breaking the loop and the solutions work just fine. But the more I revisit the code and think about that, I might find a way to improve it.
Another Case Study
This kind of functionality may be useful in other types of components as well. For example, you may also see this kind of similar user interface in some multi-select component designs as well. Below is the one I took a screenshot from Dribble.com.
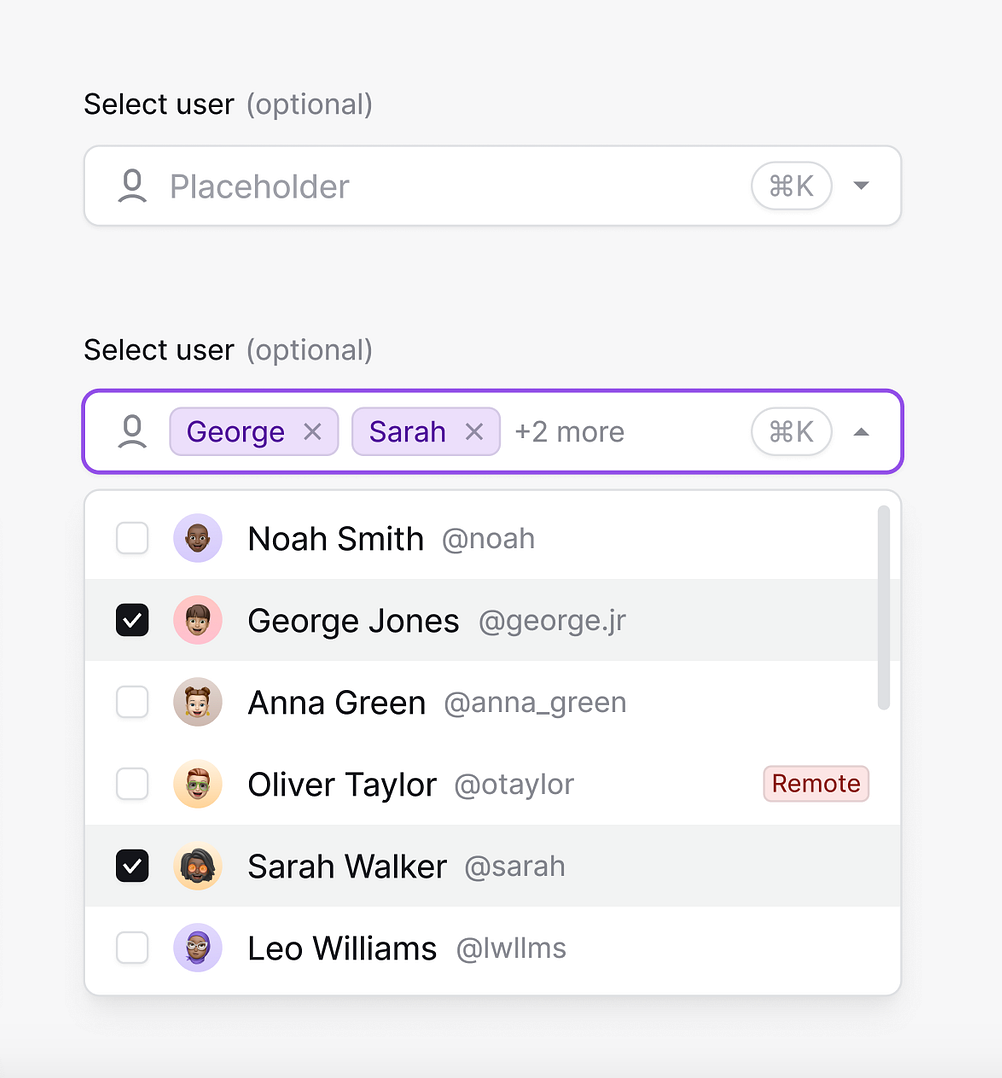
As you can see, they are very similar. With our algorithm and working solution, we can adapt to develop such a user interface as well. You can give it a shot if you want to. But enough for this blog post.
So, that's it for this development. What do you have in mind? Do you find it helpful? Let us know in the comment section. We have another interesting blog post about Front-end Development Learning Strategies. You might also find it helpful. Thank you for reading.


